5. Deploying an Install image
Interactively deploying an Install image from
WDS is a very straightforward process after everything has been set up.
With no automation provided, the process is as follows:
Boot the computer using PXE or removable media (using a discovery image) and choose the desired boot image to start Windows PE.
NOTE
Although it should not be a problem for
most computers today (certainly not one you are planning to deploy
Windows Vista to), client computers must have at least 512MB of RAM –
the required amount for using Windows PE.
Accept the defaults for Locale and Keyboard or input method and click Next to continue. You are initially presented with a wizard that begins by providing an option to specify a Locale and Keyboard or input method. Naturally, you should make the appropriate choice based on your own environment.
If prompted, provide the credentials of an account with sufficient privileges to access the WDS server and click OK to continue.
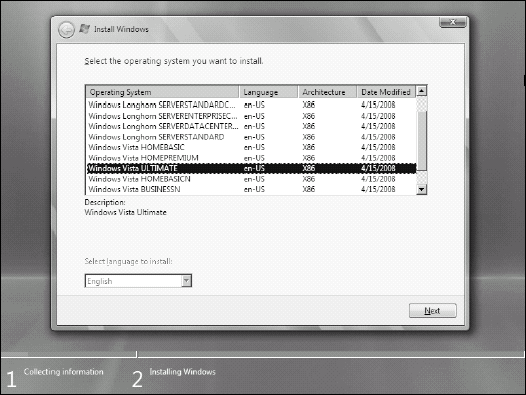
Choose the desired image from the menu, as shown in
Figure 4, and click Next to continue. If you only have one image, you will not see this menu.
The next screen prompts for where Windows is to be installed. Choose the desired drive and click Next to continue.
The WDS client then reports "Waiting for server" while it communicates
your choices. Once ready, the installation of the image begins. After
the image is applied it will restart into the newly installed operating
system, and you will see a standard installation (if a generic Install
image was provided) or a minimal installation wizard (if a custom
Install image that has been generalized was provided.
Deploying an Install image using multicast
For Windows Server 2008, you can make use of
multicast to minimize network traffic when targeting many machines at
once. To configure a multicast deployment, follow the steps below:
In the WDS Console, right-click the Multicast Transmissions node and choose Create Multicast Transmission.
Start by providing a name for the transmission that can help you to identify it and then press the Next button to continue.
Select
the image that you want to deploy by choosing the image group name and
then selecting the desired image from the list provided. Click Next to
continue.
Specify the Multicast type and then click Next. Choose from the following:
Choose AutoCast to start immediately.
Choose
Scheduled-Cast to have the multicast transmission begin when one or
more of the following triggers are specified: Start automatically when
the number of clients ready to receive this image meets the specified
threshold or Start automatically later (where you may then provide a
desired date and time).
A Task Complete dialog box is shown to confirm the multicast transmission has been created.
Click the Finish button to close the Create Multicast Transmission wizard.
6. Automating the installation of an Install image
Use the Windows System Image Manager (SIM) from the WAIK to create an unattend.xml for use by WDS. Use the following steps to focus primarily on those elements unique to WDS:
Launch the Windows System Image Manager (SIM) from the Windows AIK. The SIM tool is shown in Figure 5.
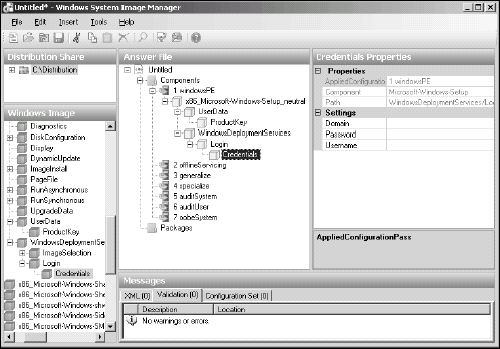
In the lower-left panel titled Windows Image, choose Components =>
x86_ Microsoft-Windows-Setup_neutral =>
WindowsDeploymentServices =>
Login, right-click Credentials, and select Add Setting to Pass 1 windowsPE. The selected component is added to the center pane titled Answer File.
Click
the Credentials node. Its properties appear in the left pane
(Credentials Properties), where you can fill in values for Domain,
Password, and Username.
You may also specify which image is to be installed by doing the same for the ImageSelection component. Drill down to Components =>
x86_Microsoft-Windows-Setup_neutral =>
WindowsDeploymentServices, right-click ImageSelection, and select Add Setting to Pass 1 windowsPE. The selected component will then be added to the center pane titled Answer File.
Click
the InstallImage node and you will see its properties appear in the
left pane (InstallImage Properties) where you can fill in values for
Filename, ImageGroup, and ImageName. You can also click the InstallTo
node to specify the desired DiskID and PartitionID numbers (typically 0
and 1, respectively, on systems with a single hard drive).
You
can, of course, modify any number of other parameters to control the
installation in the same fashion. Other components of interest include:
x86_Microsoft-Windows-Setup_neutral => UserData => ProductKey (to specify a desired product key)
x86_Microsoft-Windows-Security-Licensing-SLC-UX__neutral_31bf3856ad364e35_nonSxS (to skip automatic activation of Windows Vista)
When done, save the file to a safe place and close the Windows System Image Manager.
In
the WDS console, right-click the desired Install Image, choose
Properties, and select the check box at the bottom of the General tab
labeled Allow image to install in unattended mode.
Click the Select File button and browse to the unattend.xml file saved in Step 7..
The previous step associated the unattend file with the image
installation. Now we need to tie it to the WDS client to automate its
actions. Place a copy of it in the RemoteInstall\WDSClientUnattend
folder (with the file name unattend.xml).
NOTE
The reason there are two files is to
provide support for Windows XP and Windows Server 2003 which do not
support the unattend.xml format.
Click the OK button to apply the change.
NOTE
There is one more place you can specify a
unattend.xml for WDS, and that is in the properties of the WDS server
where you may specify a different file for any supported architectures.
When configured, the unattend.xml will be used by WDS based on the
computer's architecture if the client is found to have one specified
this way. Begin in the WDS console by right-clicking the WDS server node
and choosing Properties, selecting the Client tab and checking the box
labeled Enable unattended installation. Then, by each architecture that
you wish to support, click the Browse button to select the appropriate
unattend.xml file, and then click OK to enforce the setting.
7. Leveraging the Windows Deployment Services API
You may also use the Windows Deployment Services
(WDS) Application Programming Interface (API) to develop you own
solutions based on WDS. The API is offered for Server and Client
functions, but not for WDS management components.
WDS Server Functions that are provided
offer programmatic access to the WDS PXE server. WDS server components
include a PXE server and TFTP server for booting to the network in order
to load and install an operating system.
WDS
Client Functions provide programmatic access to the WDS client. The WDS
client components include a GUI that runs within Windows PE and
communicates with the server components to select and install an
operating system image.
The WDS PXE Server consists of both a PXE server
and a PXE provider. The PXE server contains the core networking
capability and supports plug-in interfaces that are known as PXE
providers. This provider model enables development of custom PXE
solutions while continuing to use the core PXE server networking code
base.
A sample custom PXE provider, filter provider,
and WDS client application is available in the Microsoft Windows
Software Development Kit (SDK).